Battlefield 4: Commander mode basics
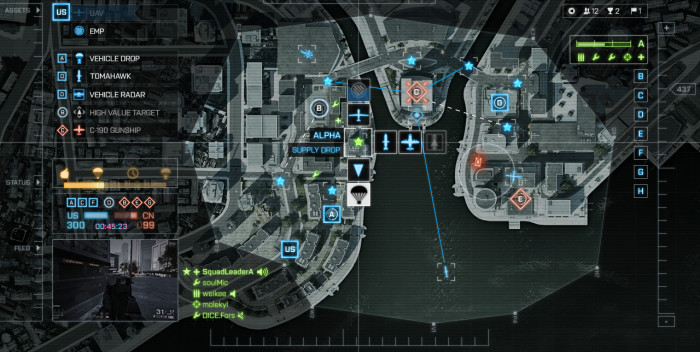
While not new to the Battlefield franchise, it’s been some time since Commander mode’s been available. Now that it’s back, inexperienced commanders will likely find the volume of data to be quite daunting. I know I did the first time I jumped in. If, however, you can learn to control data flow and compartmentalize the battlefield, you will succeed. Here are a few beginning tips on how to help your team to victory.
Take it slow
The biggest turnoff for new commanders is how much information they have to deal with when they log into Commander mode. Unlike playing as a soldier, you have to take in the whole battlefield, enemy vehicles, soldiers, troop movements, and much more. In addition, you have to weigh the value of one objective over another on the fly, all the while providing guidance and supportive measures for your team. Lastly, there’s a commander for the other team who’s just as keen to win as you are, adding one more layer of complexity to the affair.
My first advice for anyone new to Commander mode is this: take it slow. You’ll be blindsided by how much you have to think about, and your brain might start to hurt a little bit. When this happens, don’t be afraid to leave the server and open up the spot for another player. While certainly a boon to a team, commanders aren’t absolutely necessary to victory. They simply make it easier.
This in mind, when you do jump in for a full twenty minute match, watch your pace. If you feel yourself starting to speed up at making decisions and you see your cursor going everywhere, breathe. Pull back from the screen, close your eyes. You are the best commander you can be when you’re calm and focused, not when you’re trying to do everything at once. Going into a tizzy will only serve to make the information stream jumbled, and will escalate the strain on the brain. Avoid brain strain at all costs.
Start simple
Commanders have a ton of supportive options at their disposal, from UAVs to Gunships, Supply Drops and Infantry scans. They can promote squads to speed up their Support Chain, or give a stressed squad shorter respawn times. Again, all these choices can be hard to take in at once. Instead, start with the simple stuff. For the first few minutes, while you adjust, stick with deploying UAVs and directing squads. It’s a simple right click away, and all have quick reset times. You’ll learn quickly which points deserve what, and as the match continues, you can begin deploying further support.
Once you have a handle on UAVs and squad direction, look at, but do not use, those other options available to you. Click on various squads and see who you can promote, who’s just sitting around, etc. Continue putting up UAVs, but consider the match as you do so. Is there one squad pulling a lot of the weight, or is the work distributed evenly across the team? Is one area in serious contention, or is the battlefield as a whole in chaos?
If you can answer these two basic questions, you’ll have a strategy for your match. Early in your commanding career, you should experiment with various maneuvers, which flag gets a Supply Drop, when to use Infantry Scan, and so forth. That said, early on worry more about the general rhythm of the match than you direct affects on its outcome. The best commanders aren’t seen so much as they are felt. A cruise missile might be impressive, but knowing where the enemy’s holed up is far more useful in the long run.
Timing is everything
Everything in Commander mode has a cooldown. The basic spotting UAV lasts about 20 seconds, takes around 5 to reset. Ideally, then, you can keep an entire point marked for forty seconds every minute, and depend on your teammates on the ground for the remainder. You EMP UAVs, on the other hand, last twenty seconds but take about forty to recharge, so deploying them is a much more complicated ordeal. It’s for this reason I stress sticking to UAVs for your first outings as commander. You do not want to need an EMP when you don’t have one, and five seconds without enemies spotted can cost a match.
Timing is even more important when it comes to the more powerful/useful support options available. When contesting a key point, or defending a key objective, you need to know when to promote a squad vs. shortening their respawn time, when to drop supply vs. dropping a vehicle, and so on. Using one removes your ability to use the other, so take a few extra moments to decide which is more beneficial and drop it.
Lastly, don’t be afraid to pull your squads out of a fight if you know they’re outmatched. Sometimes they won’t have the whole picture, and it’s up to you to give them as much a heads up as you can. Again, letting them free for five extra seconds might end up in a squad wipe, and if you lose a position in a close match, defeat is sure to follow. Even if you think you have the time, don’t risk taking it, as Battlefield 4 is anything but forgiving. As you play, you’ll get a handle on how long one action takes compared to another, but you have to weigh all of them against their fellows within the context of the match. It’s no mean feat, but if you’re to succeed, you must master it.


